
Learning how to install packages with Winget, basic functionality, options, how to use. Difference between py.exe and python.exe
Why Winget: Winget is a Windows package Manger that can be used to download, install, update, and configure applications using the command-line. Sounds like extra steps, but it’s actually super easy to learn* and a much safer way to install stuff. Why use Winget (for IT professional/home user):
• Apps install from verified sources – no shady/fake install buttons to trick you into downloading malware
• One command that installed the app completely (you can use options to specify how you want it done)
• Installs the official version of the app – safer
• Can update multiple/all apps with one command and can be automated if you want to get fancy.
1. Open CMD(command prompt) For this lab, I was installing Python on my new machine.
Type winget – -version
If you have it installed on your Windows, you’ll see a version listed.
The syntax is simple: winget (the tool you’re using) command (like install or update: what you want winget to do) -options** (how you want the command to happen) -arguments (main piece of info that winget is acting on. So this is the name of the app I’m installing)
Winget has a lot of commands and options that you can use, but I’m keeping this simple.
2. Lets find python first:
Type: winget search python
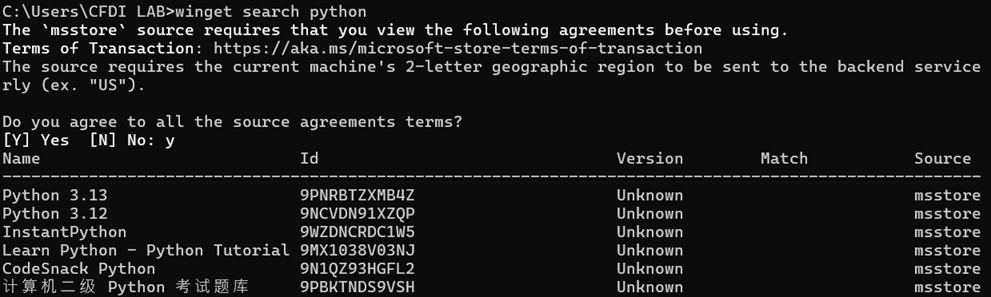
I got a list of various things that include Python either in the package name or the ID. This list also tells me (sometimes) a version and source – this is where I’d be downloading from. It can be Microsoft Store, GitHub release, official dev. site, or Winget Community Repository. These are trusted official sources, no Cnet type locations.
Keep in mind that this list isn’t alphabetical. With software that undergoes frequent updates (like Python), you want to make sure that you are installing the latest version (or a specific version you want). Scroll down the list, or visit the dev site to see what their latest release is (or visit the developer’s website).
3. Type: winget show <name/Id>
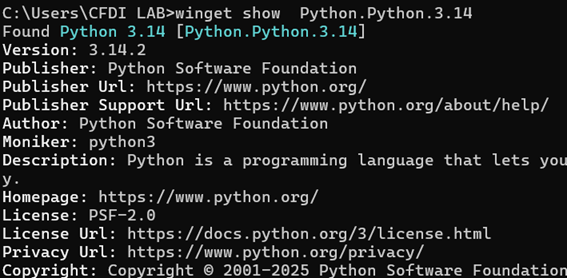
You can copy/paste from CLI by highlighting the information. “Show” command will give you a lot of information about the app, devs, version, licensing information, hashes. Some apps will have more, some less – whatever the developer provided.
4. Type: winget install -e – -interactive – -id <name/ID>
-e : tells winget to install exactly this app/id and not something that’s close
– -interactive: install with an installation GUI (if there is one available). I prefer this, because I can specify things like installation path of custom installation options.
– -id: tells winget to install whatever is specified after this option, so it always must be followed by a value. In my case – the ID of the Python package.
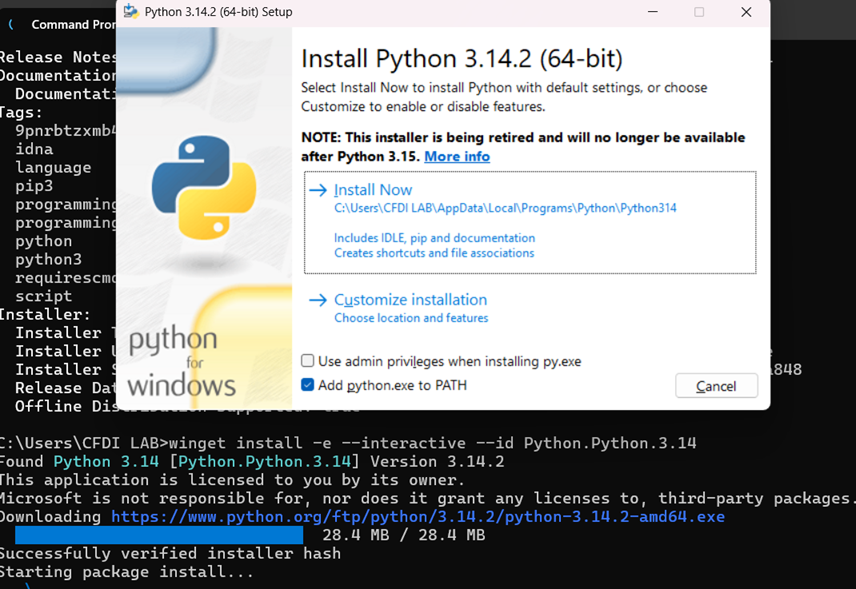
I enabled “use admin privileges when installing py.exe” so the Python launcher is installed system-wide and available to all user profiles. Adding Python to PATH allows invoking py (or python) from any directory without navigating to the install location. (Note: This is not how I thought this works, as seen below)
5. Note, winget is telling you that is successfully verified installer hash – another great way to verify you’re getting a legit package, without manually verifying hashes.
Verify your install, type: <app name> – -version
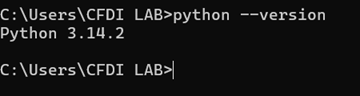
Python installed, ready to go!
PS: (Narrator voice) Except it wasn’t ready to go. If you’re a beginner like me, you might find yourself searching for your python on another profile, because you swore it was installed last night. It worked, it was successful, but Windows states “Python? Never heard that name”. So, after some time arguing with my sanity, ChatGPT, and looking up this tutorial on How to install Python, I realized what I did: Python is 2 things – a launcher and an interpreter.
Launcher (py.exe) – launches the right version of python.exe according to it’s specifications (if you have more than one version installed). Optional.
Interpreter (python.exe) – is the one executing python scripts. Not optional.
If you let it install “normal” it will install the Py.exe machine-wide, while python.exe will just be installed on that current profile. Custom option allows you to install python.exe machine-wide (not just the launcher, because WHY would I need a launcher without something to launch, huh?) It’s alright. All part of learning. Had I not been using different user profiles for labs, I wouldn’t have known. Now I know.
So, when I’m ready to install a new version of Python in the future, I will be using an option to install it machine-wide:
winget install -e – -id <name/ID> – -scope machine
*When I say “super easy to learn”, what I mean to say is: it’s a giant pain in the ass if you haven’t used CLI for most of your “computing/IT career”. From my experience so far: I rejoice when I’m able to do the simplest actions in terminal and everything takes 5x longer to do. Fact is – I’m going to use it a lot, there’s no way around it. So things like Winget – pretty easy. Overall? It’s a journey. Don’t give up.
**There are “-options” and “- – longoptions” (with two dashes). The double-dash options should not have a space between them when you type them in CLI. Don’t copy/paste my commands in your terminal (honestly, don’t). I have to add extra space between dashes here, because WP editor mashes them together when I publish.